

 Talos
Talos Omni
Omni Kubernetes Guides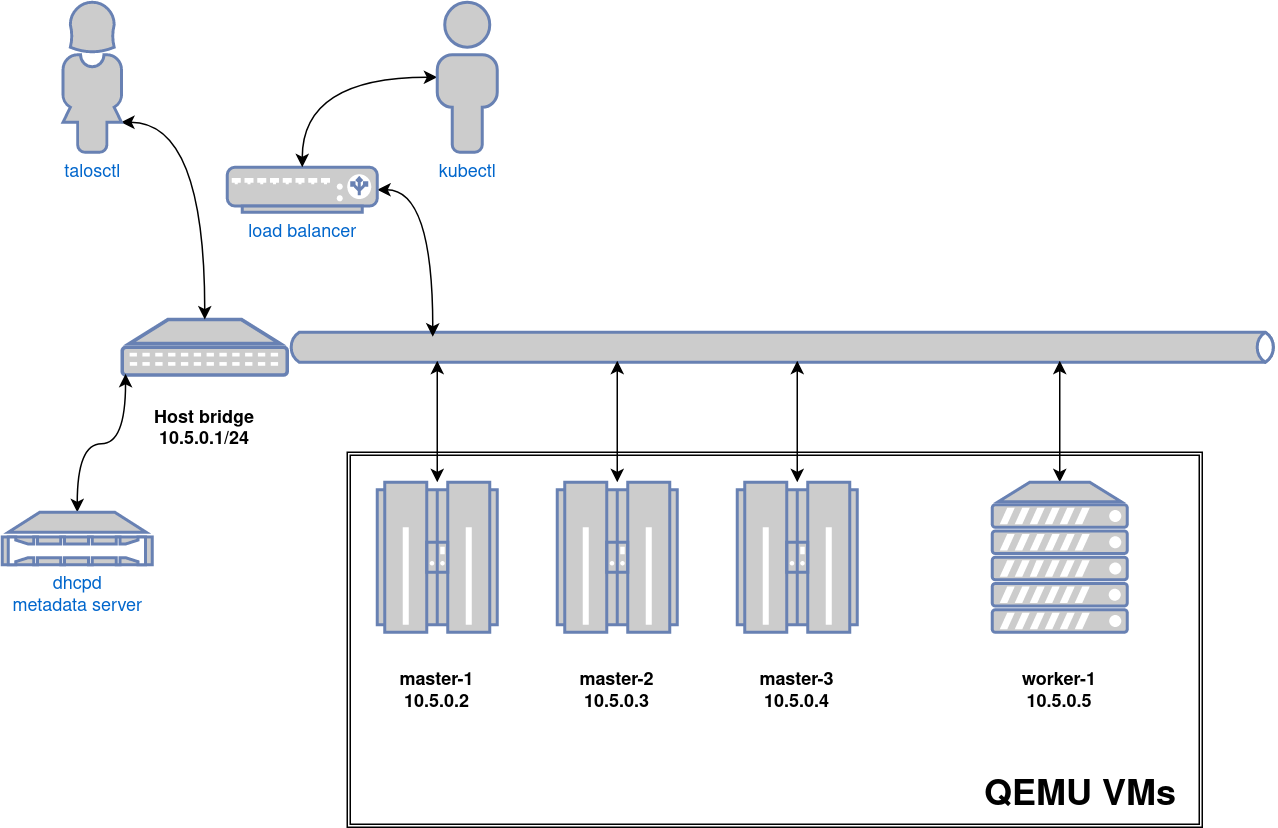
Video Walkthrough
To see a live demo of this writeup, see the video below:Requirements
- Linux
- a kernel with
- KVM enabled (
/dev/kvmmust exist) CONFIG_NET_SCH_NETEMenabledCONFIG_NET_SCH_INGRESSenabled
- KVM enabled (
- at least
CAP_SYS_ADMINandCAP_NET_ADMINcapabilities - QEMU
bridge,staticandfirewallCNI plugins from the standard CNI plugins, andtc-redirect-tapCNI plugin from the awslabs tc-redirect-tap installed to/opt/cni/bin(installed automatically bytalosctl)- iptables
/var/run/netnsdirectory should exist
Installation
How to get QEMU
Install QEMU with your operating system package manager. For example, on Ubuntu for x86:Install talosctl
You can downloadtalosctl on MacOS and Linux via:
Install Talos kernel and initramfs
QEMU provisioner depends on Talos kernel (vmlinuz) and initramfs (initramfs.xz).
These files can be downloaded from the Talos release:
Create the Cluster
For the first time, create root state directory as your user so that you can inspect the logs as non-root user:talosctl will download the CNI bundle for the VM provisioning and install it to ~/.talos/cni directory.
Once the above finishes successfully, your talosconfig (~/.talos/config) will be configured to point to the new cluster, and kubeconfig will be
downloaded and merged into default kubectl config location (~/.kube/config).
Cluster provisioning process can be optimized with registry pull-through caches.
Using the Cluster
Once the cluster is available, you can make use oftalosctl and kubectl to interact with the cluster.
For example, to view current running containers, run talosctl -n 10.5.0.2 containers for a list of containers in the system namespace, or talosctl -n 10.5.0.2 containers -k for the k8s.io namespace.
To view the logs of a container, use talosctl -n 10.5.0.2 logs <container> or talosctl -n 10.5.0.2 logs -k <container>.
A bridge interface will be created, and assigned the default IP 10.5.0.1.
Each node will be directly accessible on the subnet specified at cluster creation time.
A loadbalancer runs on 10.5.0.1 by default, which handles loadbalancing for the Kubernetes APIs.
You can see a summary of the cluster state by running:
Cleaning Up
To cleanup, run:
Note: In that case that the host machine is rebooted before destroying the cluster, you may need to manually remove ~/.talos/clusters/talos-default.
Manual Clean Up
Thetalosctl cluster destroy command depends heavily on the clusters state directory.
It contains all related information of the cluster.
The PIDs and network associated with the cluster nodes.
If you happened to have deleted the state folder by mistake or you would like to cleanup
the environment, here are the steps how to do it manually:
Remove VM Launchers
Find the process oftalosctl qemu-launch:
Stopping VMs
Find the process ofqemu-system:
Remove load balancer
Find the process oftalosctl loadbalancer-launch:
Remove DHCP server
Find the process oftalosctl dhcpd-launch:
Remove network
This is more tricky part as if you have already deleted the state folder. If you didn’t then it is written in thestate.yaml in the
~/.talos/clusters/<cluster-name> directory.
talos<uuid>
Remove state directory
To remove the state directory execute:Troubleshooting
Logs
Inspect logs directory<cluster-name>-<role>-<node-id>.log
For example in case of k8s cluster name: